 |
Plan Mode Tutorial 1
CLICK ON THE APPROPRIATE IMAGES TO ENLARGE
Fsbuild-2 tutorial (creating a new Flight
Plan in Plan mode)
Note: this tutorial assumes the reader has basic knowledge
of the meaning and purpose of SID's ,STAR's, and Airways.
Note: also the procedure (SID/STAR) numbers may have
changed between the time this document was first written,
and your acquistion of Fsbuild.
Terms: The references to 'select', or 'select this
item', means to left mouse click on the specified item.
Tutorial Flight Plan, Los Angeles (KLAX) - New York (KJFK)
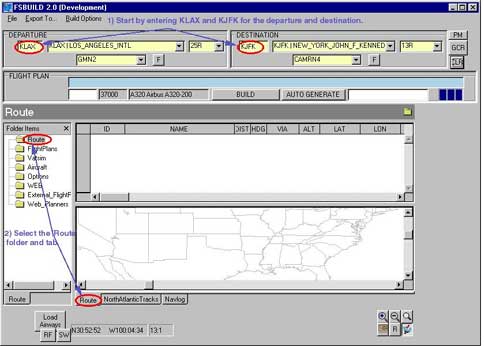
- On the left folder view, select the 'Route' folder, then
select the route tab. Plan mode will not activate unless the
route tab is selected. The route tab contains the route waypoint
table/grid and the map view the plan mode needs to work properly.
- Enter KLAX as the departure ID, and KJFK as the destination
ID. Plan mode will not activate unless a departure and destination
airport is set in the departure and destination sections.
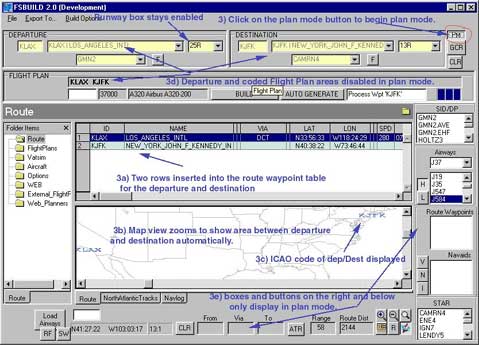
- Press the Plan mode button. This will trigger a series of events
that will set things up for you to create a flight plan in plan
mode.
- Two rows will be added to the route waypoint table
one for the departure airport, and the second row for
the destination airport.
- The Map will resize to zoom into the area between
KLAX and KORD.
- Text will display on the map representing the positions
of KLAX and KORD on the map.
- The departure and destination sections have been
disabled (grayed out) except for the runway menu.
- List boxes, and buttons will appear on the right side,
as well as some more related boxes on the bottom of
the form. These buttons and boxes only display in plan
mode.

- Click on the great circle route button, a great
circle route will be drawn between KLAX and KORD. This great
circle routing will be used a directional guide to help select
Navaids, Airways, SID's and STAR's appropriate for the route.
- In the top pane note the table has been populated with a
rows that contain latitude and longitude positions representing
the waypoints for the generated great circle route between KLAX
and KORD.
- In the bottom map view pane there is now a gray
line representing the just created great circle routing between
KLAX and KORD. The green circles represent the lat/lon positions
that are displayed in the table above.
- On the right side
the box labeled SID/DP is populated with a list of all the SID/DP's
for KLAX that are available for the currently selected departure
runway (should be 25R by default). If you select any of the
SID/DP's on the list they will highlight on the map in red.
If you scroll through the entire list all the SID's for LAX
will be displayed on the map, the currently selected SID will
be displayed in red while all the previously selected SID's
will remain displayed on the map in light blue. You may want
yo zoom the map in closer to the KLAX area to get a good view
of the SID map display.

- Compare the SID's displayed, and
use the gray great circle route line to assist in selecting
the appropriate SID for the direction of flight. For this example
select the LOOP2 SID.
- Insert the LOOP2 SID into the flight
plan, by right clicking on the LOOP2 selection, and selecting
the menu item that reads 'Insert Loop2 SID/DP' into route.

- A black line will now be drawn from KLAX and follow the LOOP2
SID path to its exit point 'DAG'.
- Then a conecting line is
drawn from DAG to the next great circle lat/lon position.
- The route waypoints table has been updated with the LOOP2 SID
waypoints replacing any previous great circle waypoints is overlayed.
- The coded flight plans box has also been modified to reflect
this change as well.
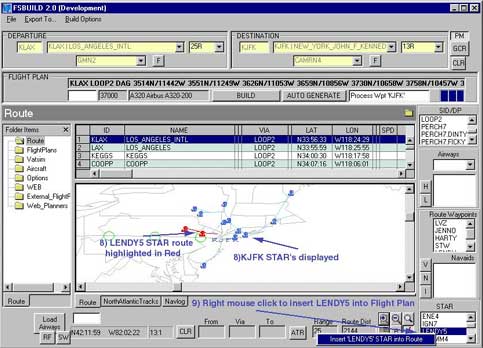
- On the right side towards the bottom
the box labeled 'STAR' works exactly the same as the SID/DP
box It contains all the KJFK STAR's that are available for the
currently selected arrival runway (should be 13R by default).
When the STAR is selected as with the on the list they will
highlight on the map in red. If you scroll through the entire
list all the STAR's for KJFK they will be displayed on the map,
the currently selected STAR will be displayed in red while all
the previously selected STARS's will remain displayed on the
map in light blue. You may want to reposition and zoom the map
in closer to the KJFK area to get a good view of the STAR map
display.
Compare the STAR's displayed, and use the gray great
circle route line to assist in selecting the appropriate STAR
for the direction of flight. For this example select the LENDY5
STAR.
- Insert the LENDY5 STAR into the flight plan, by right
clicking on the LENDY5 STAR selection, and selecting the menu
item that reads Insert 'LENDY' STAR into route.

- A black line representing the current route will now be drawn from the entry
point of the STAR (LVZ) and follow the LENDY5 STAR path to the
destination (KJFK).
- The route waypoints table has been updated
with the LENDY5 STAR waypoints replacing any previous great
circle waypoints it overlapped.
- The coded flight plans box has also been modified to reflect this change as well (you may
need to scroll to the far right of the coded flight plans box
to see this modification).

- At this point you should have
2 separate black lines representing the selected SID and STAR
routings.

- Recenter the map view near the endpoint of the
selected SID (DAG).
- The next step will be to try and select/add
airways to complete the en route portion of the flight plan.Push
down the button marked 'H' on the right. This indicates to find
high altitude airways. Nothing will happen when this button
is pushed down, this is merely settings a search option.
- Hold down the 'ALT' key then click on an area near and just
above the DAG VOR, . Hold the mouse key down, and drag the mouse
downward so that a small square surrounds the DAG VOR.
- If you look towards the bottom of the form at the 'range' box,
you should see the range numbers change as you square box is
being sized. The range displays the size of the box in square
miles.
- Size a box around DAG approximately 55 miles, the
left mouse click on the form.
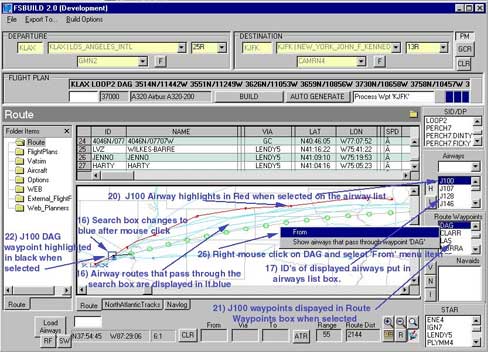
- After the mouse click, the
search box should change to blue, and you should soon see light
blue lines that pass though that blue box, those lines represent
all the airways that pass through that defined search area.
- The airways list box on the right will be populated with
the ID's of all the airways that are displayed on the map.
- Click on the airways list box , and scroll through the Airway
list As with the SID's and STAR's, selecting an airway will
cause the entire airway route to highlight on the map in red.
This will allow you to better discern the course and direction
of a single air route.
- Again use the gray great circle route
line to assist in selecting the appropriate Airway routes for
the direction of this flight.
- For this example, click on the airway list box and select the J100 airway . From the route
highlight on the map, you can see that J100 airway extends from
the DAG area, to an area near Chicago. (you may need to zoom
out the map view a bit to see this).
- The box just below the airway list box labeled 'Route waypoints', displays all of the waypoints for the currently higlighted/selected route. Scroll and find the DAG VOR on the route waypoints list, then select DAG.
- Take a look on the map near DAG, and you can see the DAG VOR is highlighted in black (zoomed out this may be a bit harder to see).
When an waypoint is selected on the route waypoint list, it is highlighted on the map in Black. VOR's display the largest on the map so they are the easiest to see highlighted when zoomed out.
- Return to the route waypoint list box and scroll all the way down to the very bottom of the list. The last Item reads OBK, select OBK.
- Take a look on the map area again, but this time near the Chicago area where the J100 route ends. The OBK waypoint is now highlighted in black on the map (again this may be harder to see zoomed out).
- The DAG J100 OBK segment is the segment to add to this flight plan. Fsbuild contains an add to route function that will insert specified airway segments into the flight plan.
- Go to the route waypoints list box, scroll and find the 'DAG waypoint. Select and right click on the DAG item, a menu will display where the first item reads 'From' select the From menu item.

- Look towards the bottom of the form, there are 3 boxes labeled 'From', 'Via', and 'To'. Note the From box now reads 'DAG', and the via box now reads 'J100'.
- Return to the route waypoints list box, scroll to the very bottom of the list, select and right click on OBK the last item. A menu will again appear, select the first menu item which now reads 'To'.
- At the bottom of the form the 'To' box now reads 'OBK'.
- There is a button to the right of the 'To' box labeled 'ATR' (for add to route). Pressing this button will insert the specified 'From-Via-To' route segment into the flight plan.
- Click on the ATR button.

- On the map view, the black route line is now extended from DAG via the J100 route to OBK.
- The route waypoint table/grid, now includes the J100 waypoints between DAG and OBK.
- The coded flight plan box is changed to reflect the insertion of the DAG-J100-OBK route segment.
- The great circle waypoints this change has overlapped or bypassed have been removed from the plan.

- A routing between OBK, and the Lendy5 STAR entry waypoint of LVZ is still needed to complete the flight plan.
- Re center the map view near rhe OBK area, and zoom in a bit if necessary to see the OBK VOR displayed.
- Press and hold down the 'ALT' key and click on the area just above OBK vor, then drag the mouse downward to create small box around the OBK map symbol, as with step ??? use the range display at the bottom as a guide and create a search box range of approximately 55 miles.
Then click on the map.
- You should as before see that search box turn blue, and see a series of airway routes in light blue. The airway list box will also update with the list of airways this search produced.
- Go to the STAR list box on the bottom right, and again select the LENDY5 STAR. This will again highlight the Lendy5 route on the map in red.
- If the LENDY5 route is not within view, scroll or resize the map so that the area between OBK and the beginning of the LENDY5 route is in view.

- In viewing the map it becomes clear there is no airway displayed that directly runs betweeen OBK and LVZ. Though this is one route that appears to come close.
- You can identify an airway on the map by holding down the CTRL key, click near on the airway line and hold for about 1 to 2 seconds. That selected route will then highlight in red, and its ID will be highlighted on the airway list box on the right.
- Select the line on the map the just passed below the LENDY5 route. The line will highlight in red, and it will be Identfied on the airway list box as airway J584.
- Look on the route waypoints box, the first waypoint listed for J584 is 'OBK'. Select the OBK waypoint on the route waypoints list box and right mouse click. Again a menu will display with the first item as 'From'. Select the 'From' menu item.
The 'From' and 'Via' boxes will read as 'OBK' and 'J100'

- Return to the route waypoint box, and slowly scroll down the list. As you are scrolling you should see each J584 waypoint you select highlight on the map VOR's will be easiest to see highlighted, intersetions because of their small size on the map will be harder to see, unless you zoom in closer.
- Continue to scroll until reaching the FQM waypoint, which is fairly close to the LENDY5 entry point.
- Select and right mouse click on the FQM waypoint, and select the 'To' menu item.
- At the bottom of the screen the from-via-to boxes should read OBK-J584-FQM. Click on the ATR button to the right of the 'to' box to add the OBK-J584-FQM segment to the flight plan.
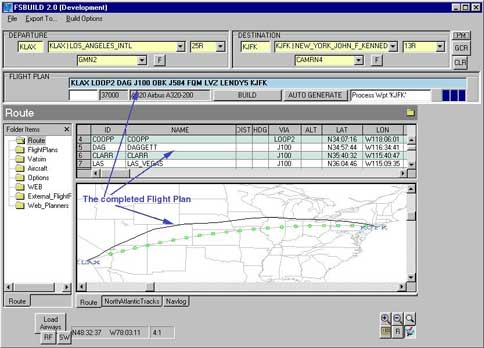
- The flight plan is now complete, click on the 'PM' (plan mode) button to leave plan mode.
- The plan mode related boxes are now hidden from view again.
- The coded flight plan box is now enabled with the new route in coded format.
- The departure and destination sections are also enabled again.
- To complete the process you simply have to press the 'Build' button.
Below are other other plan mode features not touched on in the above tutorial. Display airways that pass though a specified waypoint. When right clicking on a route waypoint item, the second menu item which reads Find airways that pass though 'XYZ' waypoint. This allows for an airway search where all airways that pass though that selected waypoint are displayed. The feature is the similar to the search box function just restricted to a speciefied route waypoint, to assist in determined which airway to use from a spcified Navaid. The Autogenerator is available in plan mode, see the using the Fsbuild autogenerator tutorial for how this works.
|
|
